Build Branching Dialogue in Godot with Our Dialog Addon 💬
Introduction
Branching dialogue is one of those systems that looks simple until your project starts growing. At first, a couple of lines and a few buttons seem enough. Then you need choices, speaker names, variables, localization, character changes, and suddenly your conversation flow is scattered across several scripts.
That is exactly why we built Dialog Addon for Godot: a lightweight addon for Godot 4 with a custom .dialog format, branching choices, reusable UI hooks, and gettext localization support.
In this tutorial, we will use the addon directly to create a small branching conversation without building a dialog system from scratch.
By the end, you will know how to:
- Install the addon in your project.
- Write a readable
.dialogfile with labels and choices. - Start the dialogue from GDScript.
- Connect a minimal UI for text, speaker name, and options.
- Keep your project ready for future localization.
Why Use an Addon Instead of Starting From Zero?
You can absolutely build your own dialogue system in Godot. But if your goal is to start writing scenes instead of spending days on parser logic, signal flow, and content tooling, an addon gives you a much better starting point.
Our addon already includes:
- A human-readable
.dialogscripting language. - Built-in support for labels, choices, and variables.
- A
Dialogsingleton you can call from anywhere. - Reusable UI nodes for common visual novel style presentation.
- Gettext extraction for spoken lines and choice text.
That means you can focus on writing scenes and designing player choices, while still keeping the system flexible enough for custom UI and game-specific commands later.
Step 1: Install the Addon
You can find the repository here:
https://github.com/Pandita-Studio/dialog-system-godot-addon
To install it:
- Copy the
addons/dialogfolder into your Godot project. - Open Godot and go to
Project -> Project Settings -> Plugins. - Enable the
Dialogplugin.
Once enabled, the addon registers:
- An autoload singleton named
Dialog. - A resource loader for
.dialogfiles. - A translation parser for gettext extraction.
- Syntax highlighting for dialog scripts.
That last point is small, but it matters. If you are going to write a lot of story content, editor support saves time.
Step 2: Create Your First Branching Dialog File
Now create a file called res://dialogs/intro.dialog.
Here is a compact example with one choice and two branches:
label start

set hero "Luna"

speaker _
	Welcome to the observatory.
	Tonight is quieter than usual.

speaker hero
	I'm {hero}, and I should probably decide what to do next.

choose
	Look through the telescope -> telescope_branch
	Leave the room -> leave_branch

label telescope_branch
speaker hero
	Then let's stay a little longer.
	Maybe the sky has something to say tonight.
hide_dialog

label leave_branch
speaker hero
	Maybe tomorrow.
	Some answers need a little distance first.
hide_dialog
This small script already shows the core ideas:
labelmarks a destination in the dialogue flow.setstores a variable.speakerchanges the current speaker.- Indented lines become spoken or narrated text.
choosecreates player options.hide_dialogcloses the dialog box when the scene is over.
The nice part is that the file stays readable even if you are not looking at engine code.
Step 3: Start the Dialog From Code
Dialog IDs come from the .dialog filename.
So res://dialogs/intro.dialog becomes intro at runtime.
You can start it like this:
extends Node2D


func _ready() -> void:
	$StartButton.grab_focus()


func _on_start_button_pressed() -> void:
	Dialog.start("intro")
That is enough to begin execution.
The addon automatically loads .dialog files it finds under res://, so you do not have to register every conversation manually.
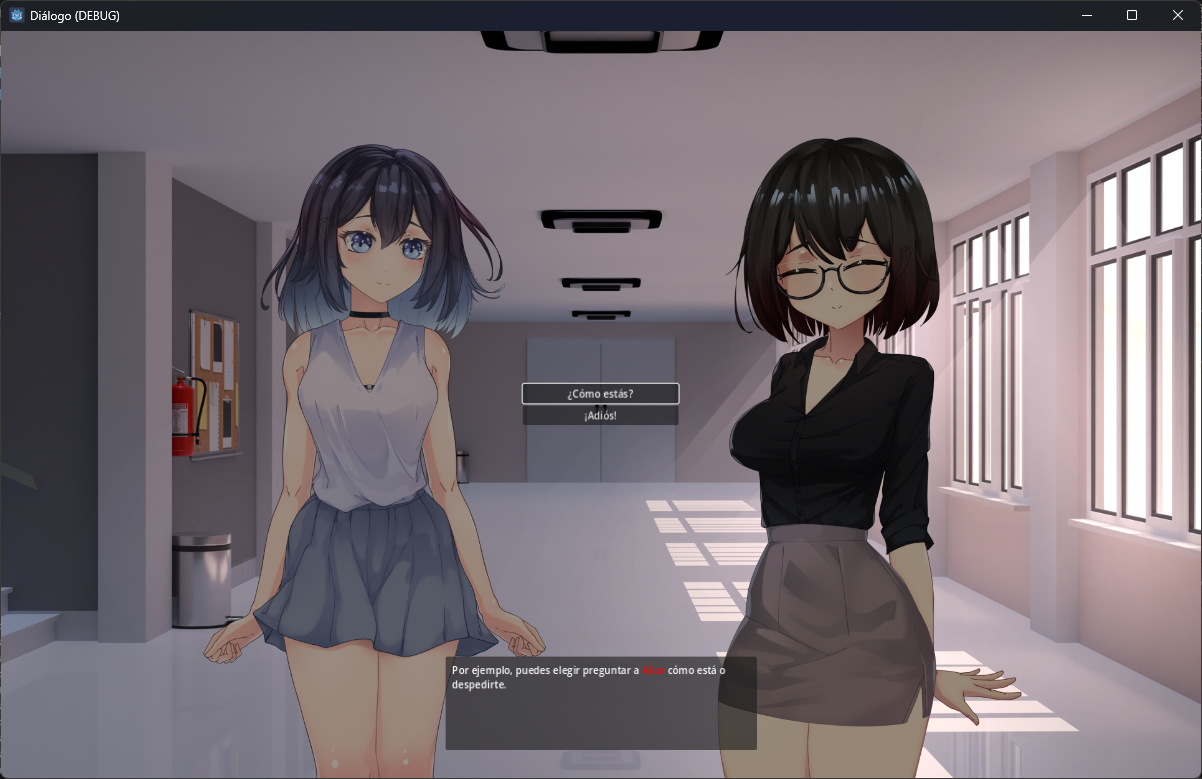
Step 4: Wire a Minimal UI
The addon already includes reusable scenes such as dialog_box.tscn and choose_box.tscn.
Those are a great starting point if you want a visual novel style interface quickly.
For this tutorial, though, I want to show the minimum signal flow so the system feels less magical.
Imagine a scene with:
- A
Labelfor the speaker name. - A
RichTextLabelfor the current line. - A
VBoxContainerfor choice buttons. - A
Buttonto advance the current line.
Then your controller script can look like this:
extends CanvasLayer

@onready var speaker_label: Label = %SpeakerLabel
@onready var dialog_label: RichTextLabel = %DialogLabel
@onready var choices_container: VBoxContainer = %ChoicesContainer
@onready var next_button: Button = %NextButton


func _ready() -> void:
	Dialog.update_speaker.connect(_on_dialog_update_speaker)
	Dialog.say.connect(_on_dialog_say)
	Dialog.choose.connect(_on_dialog_choose)
	Dialog.ended.connect(_on_dialog_ended)

	next_button.pressed.connect(_on_next_button_pressed)

	visible = false
	next_button.disabled = true


func _on_dialog_update_speaker(speaker: String, _speaker_id: String) -> void:
	visible = true
	speaker_label.text = speaker


func _on_dialog_say(text: String) -> void:
	visible = true
	dialog_label.text = text
	next_button.disabled = false


func _on_next_button_pressed() -> void:
	next_button.disabled = true
	Dialog.step()


func _on_dialog_choose(options: Array, labels: Array) -> void:
	for child in choices_container.get_children():
		child.queue_free()

	for i in range(options.size()):
		var option_button := Button.new()
		option_button.text = options[i]
		option_button.pressed.connect(_on_choice_selected.bind(labels[i]))
		choices_container.add_child(option_button)


func _on_choice_selected(label: String) -> void:
	for child in choices_container.get_children():
		child.queue_free()

	Dialog.jump(label)


func _on_dialog_ended(_dialog_id: String) -> void:
	visible = false
	dialog_label.text = ""
	speaker_label.text = ""
There are two important rules here:
- When the player finishes reading a line, call
Dialog.step(). - When the player selects a choice, call
Dialog.jump(label)with the target branch.
If you forget either one, the dialogue will look like it stopped, but in reality it is just waiting for your UI to continue the flow.
Step 5: Add More Personality With Built-In Commands
Once the base flow works, you can start making the scene feel alive.
The addon already supports commands like:
background <image_or_var> [transition]show <character_id> [variation] [position] [transition]hide <character_id> [transition]update <character_id> [variation] [transition]move <character_id> [position] [transition]play_sound <sound_or_var>play_music <music_or_var> [transition]
For example:
set observatory_bg "res://art/backgrounds/observatory.png"

background observatory_bg fade
speaker hero
	This place always feels different at night.
Using variables for assets keeps the script easier to read and easier to refactor later.
If you want a faster setup, the included UI nodes in the addon cover a lot of this already:
- Background controller
- Character controller
- Dialog box with typewriter effect
- Choice box
- Sound player
- Music player
That makes the addon useful in two different ways: you can either use it as a full starter kit or keep only the runtime logic and build your own presentation layer.
Step 6: Keep It Ready for Localization
One reason we like this workflow is that it scales much better once your project needs multiple languages.
The addon includes a gettext parser that extracts:
- Spoken lines
- Choice text
So if your project already uses Godot’s translation pipeline, your dialogue scripts can join that workflow instead of living outside it.
That is especially useful in narrative games, where branching scenes can grow fast and become difficult to translate consistently if the text is mixed directly into gameplay scripts.
If you are building a bilingual project, this part is worth planning early. It is much easier to keep text organized from day one than to untangle it later.
Common Mistakes
Here are the most common issues you will probably hit on your first setup:
The dialog never starts
Check the dialog ID you pass to Dialog.start().
If your file is named intro.dialog, the ID is intro, not the full path.
The text appears, but nothing advances
That usually means your UI never called Dialog.step() after showing the current line.
Choices appear, but selection does nothing
Make sure each option button calls Dialog.jump(label) with the branch label tied to that option.
Variables show as {hero} instead of real text
Make sure you set the variable first with set hero "Luna" before using {hero} in the dialog.
Closing Thoughts
The main goal of this addon is not to lock you into one presentation style. It is to give you a clean dialogue runtime so you can spend less time wiring basic narrative flow and more time writing scenes, building mood, and experimenting with player choice.
If you want to go further after this tutorial, a good next step is to:
- Add character portraits and background transitions.
- Split one long scene into multiple
.dialogfiles. - Explore custom commands through
unhandled_commandfor game-specific events.
If you want to test the addon directly, you can check the repository demo here:
Eduardo
CEO at Pandita Studio. Senior software and game developer (C++, Python, Java, web, Godot). Digital illustrator and university lecturer.